Wednesday, November 20, 2013

IXth of Foot Riding Habit

 I realize I have not updated since August.  The reason for my slacking is that I've been teaching costume design and costume instruction at a performing arts school.  A friend leaned over to me, and with a stage whisper asked, "Do they know they don't have to pay you to do that?

Life has been good.

There were a few fit issues to hammer out, and a lot of lace to hand-sew on, but we persevered.  The riding habit after this portrait of the scandalous Lady Worsley by Sir Joshua Reynolds painted in 1777 came out quite pleasing, in spite of some sleeve fitting issues.

To address the fit of the sleeves, I just pinned, marked, and went to town on the upper and lower sleeve pieces.

The debut of this outfit was supposed to be this year's reenactment of the Battle of Saratoga.  Unfortunately, our unit did not make it to the event.  I wore it to the Connecticut Renaissance Faire's pirate event to mixed reviews, but it's real debut ended up being a small Brigade of the American Revolution event at Putnam Park in Redding, CT.

It was my first event as a (female) civilian.  Normally, I wear a grubby ground-pounder's uniform and carry a musket for King and country.  The ladies of the Brigade were very kind and welcoming, though it was a bit strange to have to introduce myself to people I'd tangentially known for over a decade.

Being cast as the officer's wife in the little escort scenario was a tad bit awkward when the gentlemen failed to tell me one of the ladies I'd be berating for leaving the column was his real-life wife...  She was very good natured about it later.


Saturday, August 31, 2013

Nelson: Putting on the Lace

In order to achieve that "navy bro" popped collar, one-inch navy lace had to be attached to both sides of the lapels.  I acquired 6 yards of this lace from the lovely Angela of Burnley and Trowbridge, and she told me it had been made for a member of Britain's royal family, but had not been delivered due to some imperfections in the weave.  There were only about 12 inches that were not usable, so I worked around them.

I pinned the lace on both sides of the lapels in a kind of sandwich.  I stitched down one side, and then along the seam were the gold lace joins.


I used silk thread in a color that was very close to the color of the lace.

The next step is to stitch down the lace on the blue side of the lapel.  Stitching down the edge where the lace joins allows me to make a kind of bias tape, and fit it over the bulk of four layers of heavy coat wool.  The effect, i hope, will look polished and smart.

Next is attempt number three at lining.  Box pleats are the most hateful thing in the world.  Ian, of Royal Blue Traders concurs, and assures me this is why the open skirting on men's frock coats was developed in the 18th century.

I tried a two-piece lining like the one on my ladies riding habit, but it just didn't look right, so I ripped it out.  Round 3 I think, I will try something more like this:


 This is the Steampunk jacket I made last year and regrettably never blogged.  This way of lining pleats looks fantastic on the outside, but looks a bit messy on the inside.
 This is the inside of a knee-length sleeveless frock coat I made for a 7th sea costume.  This style only works when the garment is long enough to hide the fact that the pleats are a mirror image of each other.  I am leaning in the general direction of this style, but i think I will definitely do a a one-piece lining.


Saturday, June 8, 2013

IXth Riding Habit - Recutting Facings

I cut the facings way too narrow.  The buttons with the lace around them simply did not fit any way I tried it.  There was only one option left.  Ordering more fabric, and re-cutting all yellow parts.

Burnley and Trowbridge had a lovely yellow wool broadcloth for $25 a yard.  It's lighter than my original color, but still in theme.  I just used the IXth infantry grunt uniform for reference on the shape and width of the collar and facings.  It's much wider than my original eyeballing, and you can barely tell on the color difference.  Next up is handstitching buttonholes on the cuffs.  I double-layered them in the yellow wool, and they were too thick for my puny machine to handle.  I also added a buttonhole.  The IXth uniform description calls for four buttonholes on the sleeves, but it just looked more balanced with five.  Now I just have a lot of handsewing to do, and this project will be done.

Sunday, May 26, 2013

Back to you, Nelson

I had cut the facings of the riding habit too narrow, and I ran out of the yellow wool I had. Since the riding habit project is awaiting the arrival of a new yard of dark yellow wool before construction can continue, I turned back to the Nelson coat.  I really wanted to make sure the facings were a single piece so the collar could be popped like the portrait.


I attached the white wool for the facings like a lining. The two layers of blue wool that make up the collar are treated as a single piece. The white wool is then treated essentially as a lining and folded backward.  I mean to tack the actual cotton lining over all of it in the finishing process. In this instance, it seems easier to show than to tell.

 I've been waiting for parts, but I think I can tack the lining in before getting lace and buttons.


 The facings get folded back and buttoned in place eventually.  From portraits, it seems these vary in how wide they are.  Captain Cook's in the 1774 portrait are quite narrow.


Monday, May 13, 2013

IXth Riding Habit Lining and Lace


I got into attaching the lining to the project, and all hell broke loose.  Nothing was laying right, and I had cut the upper part of the lining almost two inches too short.  [Expletive.]  I frantically went through the scrap stash for the project, and hoped I had enough to cut out new lining pieces that were all one piece.  I had to do some creative piecing, and long story short, I am still not happy with it.  I may end up going for the two-piece lining again with a longer top piece. 


Trying to do a lining for the pleated skirting is something I have never had success with.  On longer things like gentlemen's frock coats, you can kind of fudge it, as the length hides the fact that the pleats aren't acting as one layer.  In something shorter like this, it just looks like it rides the short bus to school.  I think I may have to go back and figure out the two piece lining. It makes the pleats look really sharp. 
The collar and facings just didn't lay right.  I came to the conclusion that the interfacing was just too thick.  I am in the process of removing it.  Some of these issues will be resolved when the functioning buttonholes go into the collar and facings, but the lining should not be visible where the collar joins the rest of the coat.  I expect removing the thick canvas interlining will take care of that issue, but We'll find out.  I may have to rig up something where the lining is tacked down by hand around the collar.  That may work out better.  The difference between the weight of the wool and the silk is just problematic.


Adventures in Silver Mylar Lace

 The IXth enlisted lace is a worsted wool with a pair of navy blue pinstripes.  We have miles and miles of it stashed away, but for something like a ladies riding habit, I wanted to go with the officers lace.  I took a look at a few of the rectangles of the enlisted lace to figure out how they were constructed, and determined that it was much easier to show than it was to tell.  Everyone I asked had a slightly different way of doing it, including using some kind of interfacing for the construction process, or anti fray goo.  I didn't want to muck up the expensive silver lace, so I did a little experimentation using it in its original form, un-backed.  It frayed very badly, and looked awful.  Eventually, I figured out doing a quick buttonhole stitch in silk thread on the edges of each strip saved me a lot of headaches, frustration and lace.


Sunday, April 28, 2013

IXth of Foot Riding Habit

The inspiration: In part, this project was inspired by a BAR event in September.  BAR events do not allow women in uniform, so I guess this is my quiet, and stylish way to stick it to 'em.  I envisioned a riding habit styled after the IXth of Foot uniform.   I started with a portrait by Sir Joshua Reynolds of Lady Worsley, completed 1776 and currently hanging in the Earl and Countess of Harewood, Harewood House, Yorkshire.

I also came across photos of  Merja Palkivaara's riding habit on her blog, Before the Automobile, and I fell in love.  I had to have one, but I wanted mine to follow the regimental colors and lace pattern of the IXth of Foot, my reenacting unit.  Dressing in this fashion was made popular by Georgiana Spencer, the ever fabulous Duchess of Devonshire in the 1770s.


The Fabrics: I started with red worsted wool from Burnley and Trowbridge that is perfect in all ways and absolutely striking.  It's a twill weave, and much deeper in color than the picture lets on.

The lining is silk taffeta in a beautiful ivory that I acquired from Osgood Textile in West Springfield.  I found some lovely silk for the waistcoat there as well.   The gold wool is leftover from the first run of IXth uniforms from the early 2000s.


The pattern: Mill Farm 15: Woman's Riding Habit Jacket and Waistcoat, according to Old Time Patterns, suitable for 1760 - 1780.  I modified this pattern heavily for the cut-away, and the pointed waistcoat.  The waistcoat that comes with the pattern is the more traditional men's style 1770s waistcoat.  I ordered size 12-14 based on my measurements, but the pattern does not differentiate between 12 and 14.  It simply states 12 will fit loosely, and 14 will "just" fit.  I always work from a mock up, so I wasn't super worried.

The pattern has a dart across the bust that I omitted in fitting to accommodate shaping for the cut-away., and my alterations left little skirting on the front, so I'm not sure I will end up being able to do a pocket.  I may still try to place a faux pocket flap just for style.


Waistcoat: Take One: I used two light weight cable ties to brace the back seam for lacing.  When I tried it on, I decided I did not like how the the upper chest looked around the bust line, so I trimmed it down.


Waistcoat: Take Two: I made more of a V shape.  It reduces much of the fitting issues.  It will also make room for the cotton voile habit shirt and silk cravat fluffities


Progress:  Looking a bit more sharp and put together. I ended up taking the pattern mock-up in considerably at the waist to create the cut-away shape. The idea is to have it all link up with one hook and eye closure

 I cut out the lining in two pieces - skirting, and everything above the waist.  My intention is to avoid the obnoxious problems that arise when trying to line box pleats.  I think I may be on to something here.

I treated the lining and the fashion fabric as one pieces, and stitched the pleats in place.  The idea is to attach the rest of the lining over it, hiding the business part of the pleating.

Constructing the Facings and Collar:  Using my grungy IXth infantry grunt uniform as a starting point, I free-handed and eye-balled the facing shapes.


I traced the shape of the facings, and just sketched with a pencil on the yellow wool until I had an approximate.  Attaching the facings will be a bit different from the construction of the actual private's uniform.  I intend to make it a bit less rough around the edges, as these facings are just tacked on the top.  I'm still cooking up construction ideas.

Getting there.  I got the cuffs, collars and facings out of the one scrap of yellow wool.

The plan is to follow the lace placement patterns of the IXth uniform with silver mylar lace and fancy buttons.  The collar will be interlined with cotton duck cloth I had lying around.  I looked for horsehair fabric online, but was not quite sure what I needed.

Next up are some more tweaks to the waistcoat length and the jacket flaps.  I think I need to order the lace and apply it to the cuffs and facings before proceeding much further.

Sunday, April 14, 2013

Mill Farm Riding Habit Pattern

Does anyone out there have any experience using the Mill Farm Riding Habit pattern? Anyone know where I can find shots of a finished project?

Thursday, February 21, 2013

18th Century Naval Inspiration

From the National Maritime Museum, Greenwich, London, Royal United Service Institution Collection

Object ID: UNI0011, circa 1774

Full dress frock coat of a Captain. The frock is of blue wool with button back lapels faced with white and edged with gold lace. Although it is possible to wear the coat with the lapels partially buttoned across the chest, there are also three hook and eye fastenings so that the coat can be closed without unbuttoning the lapels. The neckband is also edged with gold lace. The skirts are not as full as those of the late 1740s. The back vent is still edged with gold lace, as is the pocket, and the three decorative faux buttonholes on either side of the back vent are still retained.

 The details on this sleeve is stunning, and you can clearly see the anchor buttons.  The shot of the front has provided the much-needed detail on how many buttons up the front as well as the shape of the pockets.

I must confess, I am a little afraid of making the pleating on the coat's skirt fall correctly.  I will need to examine mine and see what's what with construction.  The JP Ryan pattern did have directions for it, but I am not confident.

Seeing the pattern of the lace on the back is daunting.  It is breathtakingly gorgeous, and I'm sure I will need something like 20 yards of the lace.

The next step for me is to iron, and cut out the lining.  I am still waiting for the white wool for the facings to come in.  I haven't even ordered the buttons or the lace. 

1. Lining
2. Construction of the back pleating/vents
3. Attach the lining/facings
4. Buttonholes
5. Lace
6. Buttons
7. Done.

Wednesday, February 20, 2013

Shameless Plug - Gibson Edwardian Shoes

 
Lauren of American Duchess is running a promotion for her new "Gibsons" - Edwardian style shoes patterned after extant examples.  I thought I would take a moment to show everyone how amazing they are.  I was thinking some kidn of Downton Abbey inspired picnic as soon as it's warm enough...


Tuesday, February 19, 2013

Nelson: Sleeve Details

I have been combing the internet for images to help with sleeve and trim detailing.  I found a few portraits from the Revolutionary War years, and a few before. I'm going to try to recreate Nelson as best as possible, but the 1775 portrait of Captain James Cook (1728-1779) by Nathaniel Dance-Holland at the National Maritime Museum had the best angle for understanding how the lace is layered and folded. - http://www.nmm.ac.uk/explore/collections/by-type/uniforms/

I have ordered white wool for facings from a seller on Etsy named Gabriel Everson - http://www.etsy.com/shop/ThePeriodTailor.  I have white muslin for lining.  In the next couple of months, 50 buttons from Military Heritage.  It's going to be about $107 plus shipping for the buttons, so we will need to do some strategic spacing out.   I really do think all of this persnickety attention to detail will pay off, and when it hits the ballroom next winter, everyone will be awed.
 

Thursday, February 14, 2013

Gold Lace

After crowdsourcing this one on Facebook, I came up with a better lace option.

From the website: http://www.militaryheritage.com/militarybraid.htmhttp://www.militaryheritage.com/militarybraid.htm - 1 inch (25 mm) Gold Metal Navy Braid for Royal, British Commonwealth and U.S. Navy uniforms and decorative trimmings.  This is excellent quality metal wire lace and is often sold for many times this price.   This pattern is the Royal Navy double vellum (Orris) was used for the past 250 years.  1 inch lace was used on Captain and Admiral coats.  In addition the American Naval officers in 1812 were often portrayed with this pattern of lace as well.

This is the lace that appears in the portrait of Nelson., one inch wide.  It is a bit pricey, but I think it will be worth it.

Sunday, February 10, 2013

Young Horatio Nelson Coat

At our house, bad weather means projects.  I decided to take on a fancy one.  DN's 18th century wardrobe is largely noexistant.  For our last 18th century dance event, I threw him, somewhat against his will, in my IXth uniform.  It didn't fit too badly, but aside from fit issues, a grubby stained infantry grunt's uniform doesn't really belong in the ballroom.  I got a brilliant idea to re-create an accurate 18th century Royal Navy uniform for him.  It can do double duty for 18th century dance events and for 7th Sea.

I combed through a few portraits, and found one that fit the bill date-wise and general look and feel.

The young Captain Horatio Nelson, painted by John Francis Rigaud in 1781, with Fort San Juan—the scene of his most notable achievement to date—in the background. The painting itself was begun and nearly finished prior to the battle, when Nelson held the rank of lieutenant; when Nelson returned, the artist added the new captain's gold-braided sleeves.  (Borrowed from Wikipedia - Caption information from John Sugden's Nelson: A Dream of Glory, p. 464.)

Date: 1781
Medium: oil on canvas
Dimensions: Painting: 1270 mm x 1015 mm; Frame: 1250 mm x 1500 mm x 100 mm
Current location: National Maritime Museum
Accession number: BHC2901
Credit line: National Maritime Museum, Greenwich, London. 


All of the portraits I could find all have the facings un-bottoned, collars popped like the 18th century Bros they are.   Visit my Pinterest board to see - http://pinterest.com/arachneattire/18th-century/.

 The pattern I used as a base was JP Ryan's 1750’s Coat with Military Variations for the Officer orEnlisted Man.
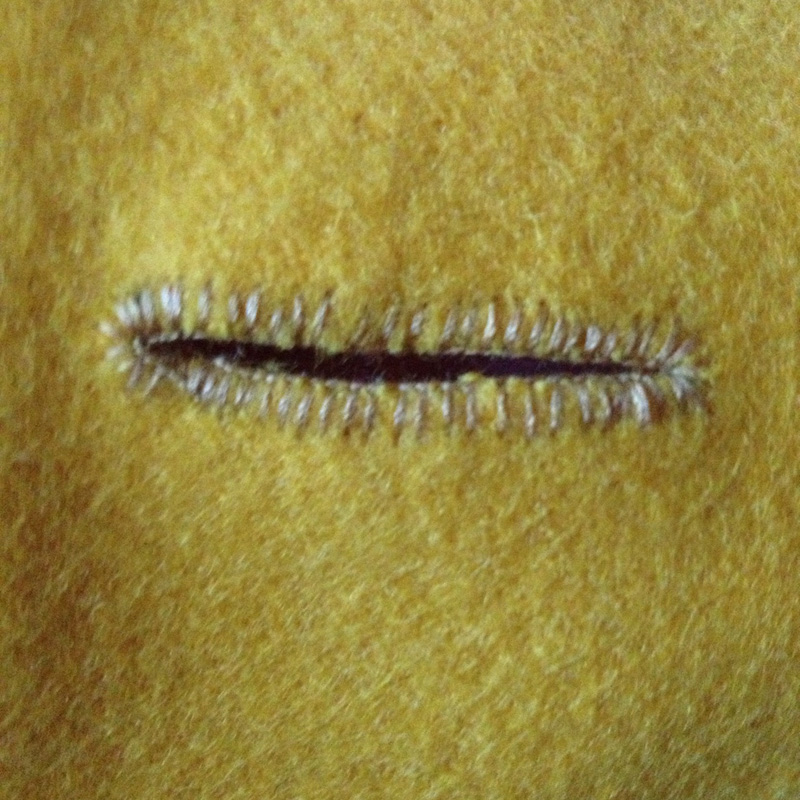
  The pattern has the facings as a separate piece sewn on as an after-thought on the front of the coat.  All these portraits from the 1770s-1780s show the open, unbuttoned collar and that it is clearly one piece.  In order to keep maximum accuracy, and badassitude, I figured I had to alter the pattern to be a single piece.

I used a dark navy blue wool broadcloth from WM Booth Draper, which featured this caption.  Broadcloth, 100% wool, Navy Blue, 24 oz., 60" wide, $25/yd.
WWB 750

This wool was intended for the New York City police department which has very strict quality standards, according to WM Booth Draper.  It is lovely, thick and is the perfect color for the 1781 portrait of Nelson.

I have not yet managed to find 100% wool in white or buff for the facings, but I haven't given up yet.  I see a trip to Osgood Textile in my future.


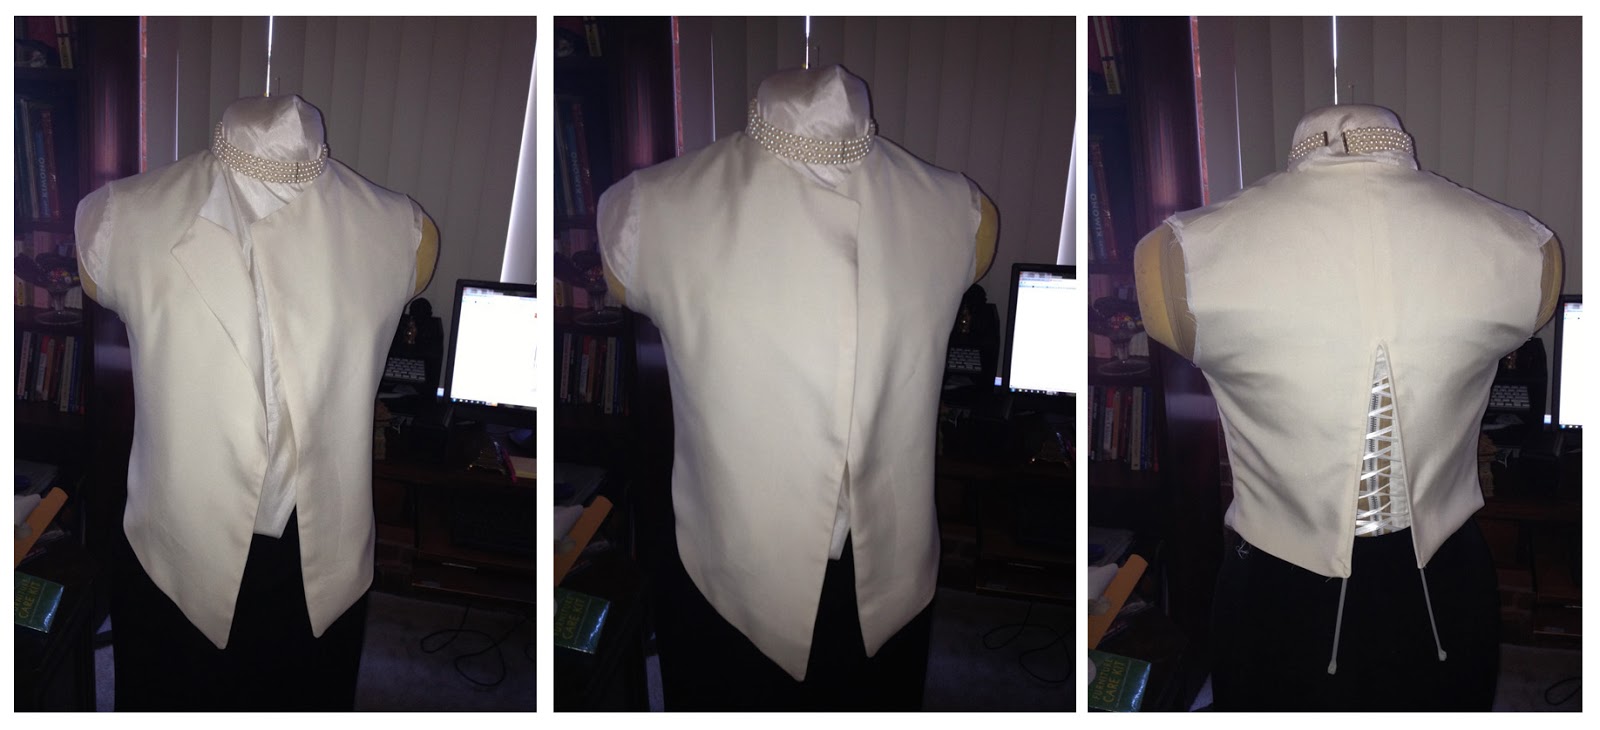
 I think Norma Jean objects to being dressed in a man's military uniform, but this project is going to be absolutely spectacular when I get all the shiny lace on it.

Metallic Gold Lace - From WM Booth Draper - During the 18th century each officer went to his own tailor for clothing. Therefore there was no regulation officer's lace. The same gold lace on an officer's coat could be found on civilian clothing. For example in The Proceedings of the Old Bailey in 1775 there was a trial for three thieves who "were indicted for stealing . . .  a blue silk waistcoat, trimmed with gold lace, value fifteen shillings".

$3.95/yd.

I'm pretty sure I will need 100,000 yards of it.  Sigh.


Saturday, January 5, 2013

Queen of Hearts: Red Striped Silk Robe à l'Anglaise

I acquired this gorgeous red striped silk at Astoria Bargain Fabrics in Astoria, NY over a year ago.  SG made a beautiful 18th century Robe a la Turque with it.  I have been dreaming of a stripey Anglaise ever since.

News came of the Twelfth Night Ball in Sudbury, MA this year, and I got to thinking.  My green silk taffeta gown had a cat-related accident, and the rest of my 18th century wardrobe is either too small, too day-wear, or too somber.  Obviously, I had to make something new.  Good thing I had 10 yards of this cherry red striped silk in my stash.

I pulled out the same muslin pattern I used for the navy blue Anglaise (which is now finished and trimmed.  More on that later.)  I made a few adjustments, and had it cut out rather quickly.  However.

My first attempt at matching stripes did not go so well.  Just slightly off.  I knew it would drive me insane, so I re-cut the front pieces, and the back pieces.

The stripes match up, and the chevron pattern they form with the back pieces adds a certain level of visual interest.  My aim is to have this done for January 11, but I do not intend to hurt myself (or others) trying to make that happen.

I started calling it the "Queen of Hearts" gown because the red stripe reminded me of the visual on playing cards.  I thought that for a fancy dress type occasion, it would be really easy to decorate this with black silk ribbon trim, and black velvet heart details.  Maybe some 18th century playing cards in my hair.

I realize the Alice illustration is a parody of Queen Victoria, but it serves as inspiration.